The drawing tools available in Apple's creation apps are simple, yet powerful. Even a non-artistically inclined person can create digital graphics without even leaving the application they are in! Even more importantly, the act of creating infographics can lead to deeper understanding and longer-term learning for students.
Note: Whether demonstrating the drawing tools in Pages, Numbers, Keynote, or even iBooks Author, the process is the same. Use these ideas as starting points. What kinds of lessons do you teach that would lend themselves to students creating information-filled graphics?
First some teaching resources:
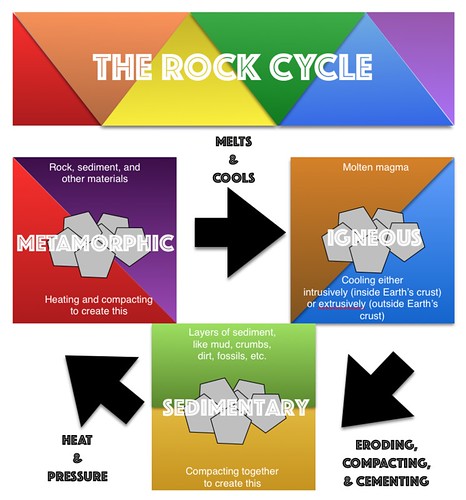
Creating Infographics is an excellent learning activity in content areas as well.
See a few student examples about the Rock Cycle from Kevin Morrow's 8th grade Science class here. Mr. Morrow commented on how visible the student creations made their understanding of the science content he had taught. In addition, he enjoyed the variety and creativity that the project allowed for.
Don't abandon printed projects... just enhance them with technology integration!
This was a driving force in a recent project I had the honor of working on with the West Holt 4th grade classes. Mrs. Shirley Rossman wanted to create a class book to demonstrate their collective knowledge of Nebraska history. And the 150th anniversary of Nebraska's statehood was the perfect backdrop.
Excitingly, she reached out to me looking for ways to infuse digital media into the printed, bound book that she envisioned as a class product. We collaborated to design an augmented reality experience for the reader, where each student's two-page spread could be brought to life with AR.
This was our process:
1. Text development
Students selected their Nebraska topics, researched them, and wrote their text narrative for their page. The pages of the book were mapped out on large classroom posters. To preserve the authentic student-authored look and feel, Mrs. Rossman had each student hand write their text onto one of the page templates to go to the Schoolmate Publishing Company that she had selected to produce the class book.
2. Create trigger images
Students created original artwork to accompany each page of text, again drawing by hand on the book template pages. I used the iPad to take a quick photo of each student's page of artwork so that I could designate each one as a trigger image for the augmented reality we planned to build in.
*Side Note: I applaud the originality and creativity of the students' hand-drawn images. While it would have been easy to find images online or even create them digitally, the authenticity of these students' illustrations makes the book extra special.
3. Create media assets
Each student had the opportunity to create at least one media asset to accentuate their topic. We talked about bringing their research "to life" and trying to enhance the content in a creative, not simply redundant way. This was truly where student choice and voice could shine. App which I demonstrated as suggestions to choose from included:
Chatterpix
Tellagami
Toontastic/Toontastic 3D
Puppet Pals 1&2
WordFoto
iMovie
DoInk Greenscreen
Nearly every app was new to the students but the definitely jumped in and learned quickly! Some student seven created multiple assets that could be selected when readers scanned their image. Mrs. Rossman did a wonderful job of coordinating additional parent volunteers, para professionals' help, and simply workspace on the days we reserved for media production.
We did post all the video assets on a YouTube playlist, just as a secondary way to showcase the students' work and creativity.
4. Blipp-building with Blippar
While Mrs. Rossman sent away the physical pages of the book to be printed and bound, I began working to develop the augmented reality interface.
I selected Blippar as our AR platform because of its reputation with education, in addition to its free price. Teachers can sign up for the Blipp-builder dashboard and create unlimited "blimps" for their classroom, completely for free. Blippar, the app which readers will use to 'scan' the pages, is free as well, and available from both the iTunes and Google Play Store.
While the blimps created with an educational account aren't "public" they can easily be viewed with a simply "campaign code." This is a 5 digit number that users enters into the settings of the app prior to scanning. We put these directions as the pregame page in our book:
The Blippar dashboard asks you to first name your campaign: West Holt 4th Grade NE History Book and then create a blipp for each student by uploading their trigger image.
To add to the interaction, you have several options. The student's media asset can be displayed on initial startup. Or you can add a "button" for the user to tap to initiate the media asset. Sometimes I used generic buttons from the Blippar library, but often I used a custom logo that I created for the project and uploaded to the Blippar library.
Various actions can be accommodated on each tap. Ones we primarily used included:
play video (either uploaded directly to Blippar or linked online)
view image gallery
go to URL
open PDF
Each blipp needs to be saved and published individually, but all can be accessed with the one campaign code in the app.
It seems there is a world of untapped potential to blips-building and I have a feeling that we only scratched the surface with this project!