Showing posts with label lessons. Show all posts

Tuesday, October 29, 2019

Topics and Trends in Tech Integration (November newsletter article)

Topics and Trends in Tech Integration
By Katie Morrow, ESU 8


The following are current technology integration projects and practices that ESU 8 schools have been busy with recently. Remember that the invitation is always open if you see something from this list that you would like to try in your classroom. Contact us at ESU 8 and we would love to help get something planned in your school!
  • Digital book creation: A digital book is so much more than a book. Rather it is a container/organizer for all kinds of learning! Use a digital book as an investigation journal, a portfolio, a class collection of pages on a larger topic, or even a way to document a school event. Publish and share with the world without wasting any printer ink!
  • Creative media production: Whether a quick project like the greenscreen “Wormhole Challenge” or a class project like content area student-produced videos, students can practice interview skills, speaking skills, editing and creativity. Videos are a universal way to share what is being learned in the classroom with the rest of the world!
  • VR and AR: Virtual and augmented reality can bring content to life. Students can experience apps to take them places they couldn’t normally go: for example the inside of body systems or underneath the ocean floor. Also possible is students creating their own VR and AR creations with tools such as Google's Tour Creator, AR Makr app, or Blippar.
  • Digital resources for research: Utilize World Book online, Learn 360, or Virtual Field Trips to connect your class with first rate global resources- all with virtually no cost. Avoid simply going on a Google search and use higher quality resources for whatever your next educational project may be.
  • Blended Learning and PBL: Here’s a framework or a learning methodology to make your next project more student directed. Student agency empowers learners to be responsible for choices impacting their productivity and understanding of content. Make your next unit more personalized by blending in some project based learning or station rotation experiences.  
  • Gamify with assessment tools: Use technology for your next classroom review session and make learning fun! There are so many readily available formative assessment tools that you can choose a new one each unit so students don’t grow tired of any of them. Even some traditional tools have new features, so ask about ways to gamify that next class review session. 
  • Learning Management System tools like Canvas or Google Classroom: The easiest way to take technology integration to the next level in your classroom is to employ a system of content delivery and student interaction. Even Apple Classroom has updates to make their newest technology more manageable for all. Work with us to uncover ways your LMS can allow for more productive learning environments. 
  • Coding: Expose students to computational thinking by integrating some analog "intro to coding” activities. Or give them time to explore Swift Playgrounds on iPad or the code.org website. Or bring the Sphero programmable robots to your school for a coding kick-off activity. Once you get kids hooked, the sky is the limit for their future!

For additional ideas and examples from ESU 8 schools recently, be sure to check out my Instructional Tech at ESU 8 blog at: https://esu8tech.blogspot.com  

Sunday, October 6, 2019

Animal Adaptations Infographics

For this year's ESU 8 Elementary Science Olympiad, activities were centered around a phenomenon. Students were scientists as they explored and experienced topics with connections to that phenomenon.

During my rotation we learned about animal adaptations and how they help animals survive. Each pair of students created an infographic in Keynote on iPad to visually share their scientific knowledge with others.

To replicate in your classroom, I recommend starting with the Everyone Can Create: Drawing guide book from Apple Books. Chapter 9 is all about infographics and contains solid examples as well as planning considerations.
Everyone Can Create Drawing
We also examined this Snowy Owl infographic example to look for critical features of an infographic as referenced in the Everyone Can Create chapter.

Next student pairs each chose an animal that interested them and researched it on World Book Online Student Edition. ESU 8 provides access to this valuable resource to all our schools and it tremendously helped with efficient and responsible research for this age group of students. Older learners could use Advanced and younger grades the Kids Edition of World Book Online. We discussed how to cite and credit the article for their researched and then navigated to the media tab to choose the image to be the center piece of their infographic. Students copied their animal's image and then opened the Keynote app to begin to create.

Prior to students arriving, I used Apple Classroom to distribute a Keynote file where I had created a custom theme with different biome backgrounds set to 50% opacity and locked in the background of the slide design options. This was mostly to maximize time for students to create.

(To make your own version simply create a new Keynote, View > Edit Master Slides, delete the existing masters other than the blank one, duplicate that and add a different background image to each, name each slide master and choose 'Done'.)

Now, all students needed to do was add a new slide (blue + on bottom left) and choose the biome that most closely matched their chosen animal. They pasted their image on the slide, resized and some used instant alpha to clean up the background. (Note: If students had access to Apple Pencil, I would encourage them to trace, color, and delete the original image in order to have a truly personalized look for the visual focus of their infographic.)


Using my example of a deer and its adaptations that I created below, we continued to go back and forth (or use Split Screen view on the iPad) between World Book Web and Keynote in order to add the following components:

  • Title
  • Name of biome
  • Map of where it lives
  • at least 3 adaptations that help it survive


Keynote skills the students learned included:
  • Adding and editing text
  • Inserting drawings
  • Using shapes, callouts, and connectors
  • Recording audio (for a few early finishers)
Also during this fast-paced 45 minute lesson we discussed critical design elements including, font, color, layout (proximity & space), and contrast. 


After all the student groups had rotated through, it was easy to collect the Keynote files through Apple Classroom and send the completed infographics back to their teachers. You can view the students' creativity and scientific knowledge in this online gallery.


Thursday, January 17, 2019

Third Grade Authors publish book about their community's history

The ABCs of Our Community, O'Neill on Apple Books Store
O'Neill Elementary's 3rd Grade Reading class, under the direction of Mrs. Julie Pistulka along with help from Katie Morrow, ESU 8, recently published their latest version of an annual community history research project. This year, the creative student authors compiled and shared their information in the form of an alphabet book.

Using a Pages template, each "letter" consists of 3 pages:
1) a stanza of poetry and photo gallery on the topic
2) written report from student research
3) student-created artwork
template created in Pages and distributed to student iPads via Apple Classroom

Students added audio narration for all the text with the newest feature of Pages books - Audio Recordings.

Learn more about the community of O'Neill, Nebraska as well as student creation of digital books with Pages on iPad by downloading the book from the Apple Books Store.


Wednesday, November 21, 2018

Live Loops Lexicon: A vocabulary lesson with GarageBand


For 5th and 6th graders this was their first exposure to GarageBand. As we didn't have enough time for them to work through the Everyone Can Create Music book in its entirety, I gave a brief overview of how Live Loops worked and let them experience the power of music creation via discovery mode. 

Then they randomly selected words from a "power words" vocabulary list I pre-made. Their task was to create a "Live Loops Lexicon" where the feel of the music helped bring to life the meaning of the word. After their 30-60 seconds of music was created and captured, they added a microphone track and voice recorded their word, its definition, and usage in an original sentence. 

Alternately named "Lingo Jingles" this was a simple activity that introduced students to the power of creating music with GarageBand, while at the same time broadening their vocabulary!


Student Examples:


Monday, September 3, 2018

Students Authoring Books with Pages


Every year on September 8, International Literacy Day is celebrated. In conjunction with this year's celebration, AppleEDU has launched a #PagesBookChallenge. The challenge is simple. Create a digital book with your students in Apple's Pages app (free creation app for Mac or iPad). Then, simply tweet a short synopsis of the book along with its cover and tag #PagesBookChallenge.


To encourage all educators to participate here a series of short tips and recommendations for creating digital books with Pages.

1. Begin a new Pages project using the Books templates.

Tip: Use Portrait templates for primarily text-based books (so that the reader can resize the text and the pages will adjust accordingly) and Landscape for fixed layout books (where you control the exact design and layout of the pages and the reader cannot adjust).

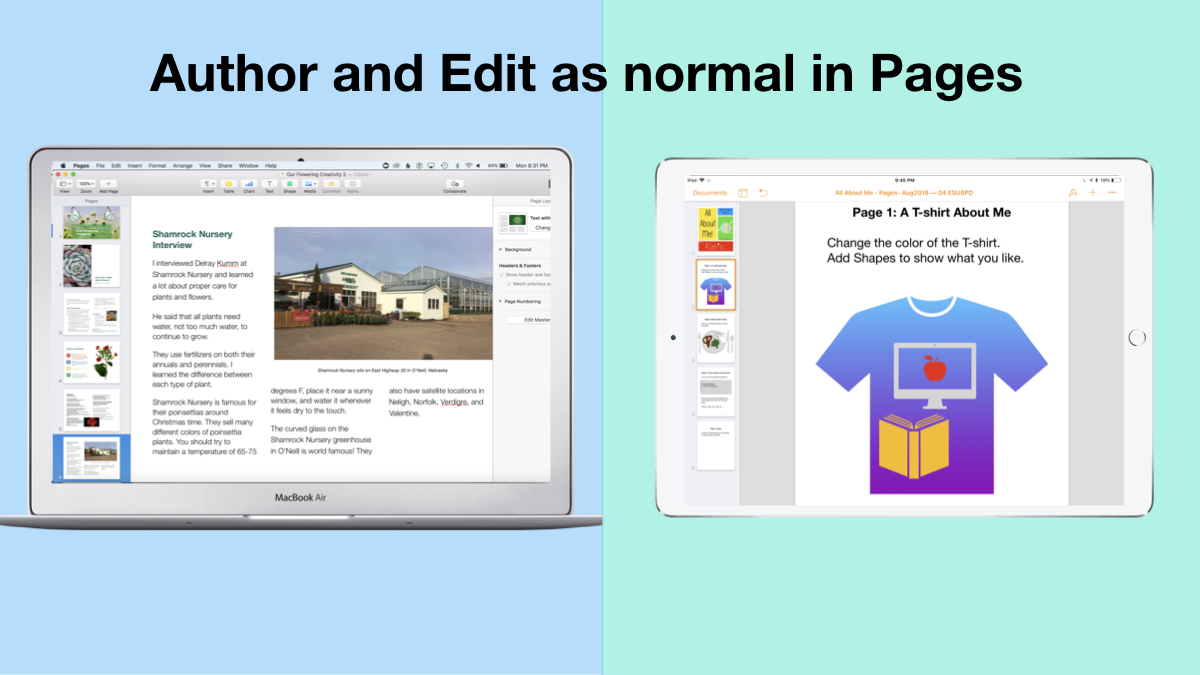
2. Author and Edit as you normally would in the Pages app. 

The beauty of the iWork suite, in my opinion, is its simplicity and consistency across apps. Unleash your creativity!

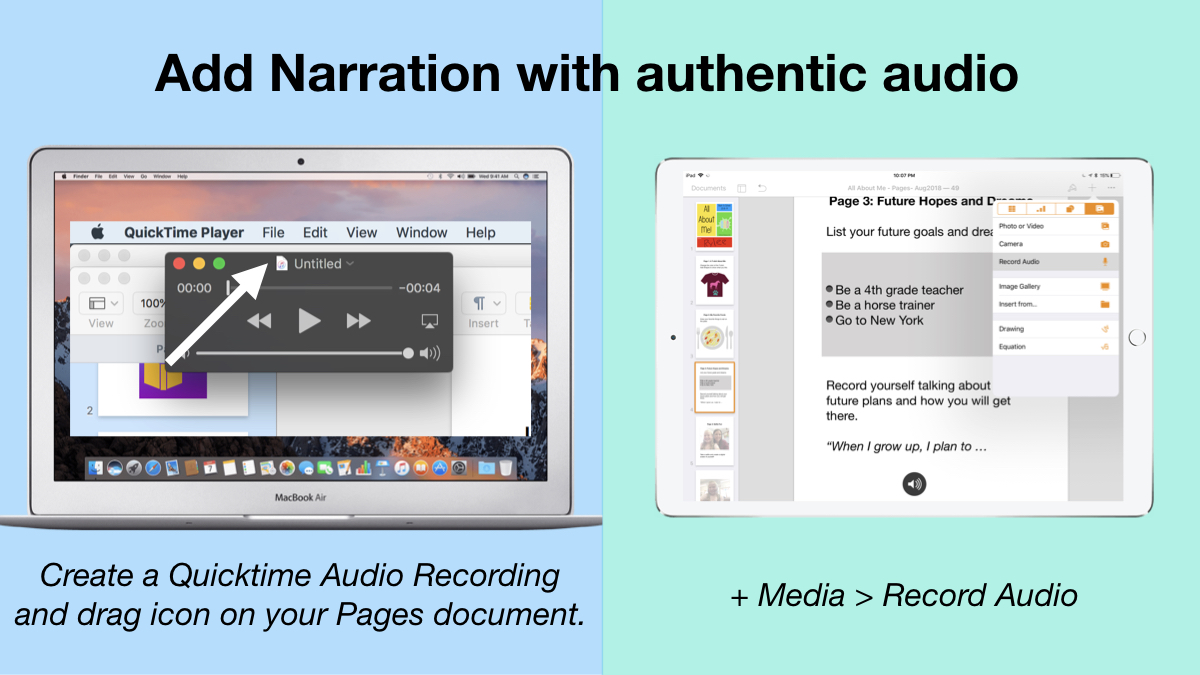
3. Add narration with authentic audio

On Mac: Create a Quicktime Audio Recording and drag icon next to filename onto your Pages document.
On iPad: Tap the +, choose the Media tab, and Record Audio, then add to page.

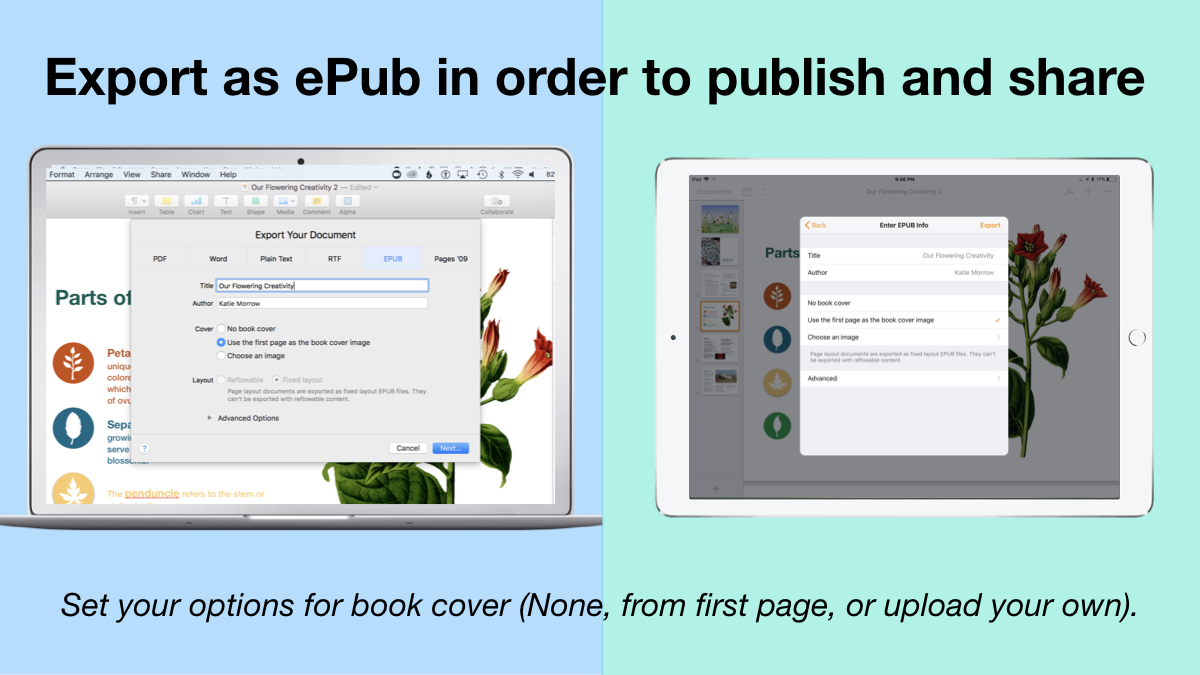
4. Export as ePub for Publishing and Sharing.

Title your book and name the author. Set your options for book cover: (None, from first page, or upload your own).
There you have it! Anyone can create a book with Pages. 


 Student books authored in Pages by Mrs. Troester's English 8 class, Spring 2018. (Science "Explainer" books for younger learners)

As educators the possibilities are endless when authoring books with Pages. To help learners experience authentic authoring, encourage them to work through all stages of the writing process. Here is a 60 second reminder of how to do so within the Apple ecosystem.


Finally, teachers can use Pages templates to help students focus more on the content of their books, and less on the the design of the pages. Whether for professional learning experiences, class books where every student authors a piece, or even shorter individual writing projects, simply create a Pages book as a starting template. Share the Pages document as a starting point and allow the learners to customize the content. Be sure to take advantage of the following features:

Media placeholders

Add image gallery placeholders from the Media button. This is a preset placeholder for the author to add an entire gallery of images.

Add text boxes and utilize Paragraph Styles

Text boxes are automatically ready as placeholders. Simply change the paragraph style and/or formatting.

Build your own photo/video placeholder

Add an image (or screenshot). Select the image and choose:
On Mac: Format > Advanced > Define as Media Placeholder

Add pages as desired and distribute to all your budding authors.  

I cannot WAIT to see what creative ideas you and your students have when creating books in Pages!


Friday, August 31, 2018

4 Types of Sentences... Zoom Clues in Clips!

Shirley Rossman, 4th grade teacher at West Holt Elementary, just finished teaching her students about the four types of sentences. In order to reinforce these key concepts, she had the idea to adapt the concept of "Zoom Clues" videos made in Apple's Clips app and challenge her students to demonstrate mastery.

Here is the project workflow:

  1. Students choose a "mystery object" and author FOUR sentences (one of each of the four sentence types: declarative, imperative, interrogative, and exclamatory) giving clues about the object's identity. 
  2. Students take a photo of their chosen mystery object with the iPad camera. The image should be fairly close up, but show the entire object, as this will be the view shared as the "answer" to the Zoom Clues video. 
  3. Students start a new project in Clips and add a poster image to introduce their video.
  4. From the Library, bring the photo of the mystery object into the "stage." Pinch to zoom in as far  as possible, and position the image in a way that guessing the object could be challenging. Add a label with the first clue and press the big red record button to add to the Clips project. 
  5. Zoom out just a little and/or change the viewpoint, add the second sentence clue with a new label, and record the clip. 
  6. Repeat for the last two sentence clues. 
  7. Add a conclusion slide that shows and reveals the answer.
  8. Add music and export the final video to share it!

Here is a sample "4 Types of Sentences Zoom Clues" that the West Holt 4th graders and I quickly made together, but hopefully soon they will share some more clever examples of student creativity! Check back soon!


Thursday, May 25, 2017

Creating Infographics: Drawing Tools with Pages and Keynote

The drawing tools available in Apple's creation apps are simple, yet powerful. Even a non-artistically inclined person can create digital graphics without even leaving the application they are in! Even more importantly, the act of creating infographics can lead to deeper understanding and longer-term learning for students.
Note: Whether demonstrating the drawing tools in Pages, Numbers, Keynote, or even iBooks Author, the process is the same. Use these ideas as starting points. What kinds of lessons do you teach that would lend themselves to students creating information-filled graphics?

First some teaching resources:


Creating Infographics is an excellent learning activity in content areas as well.   


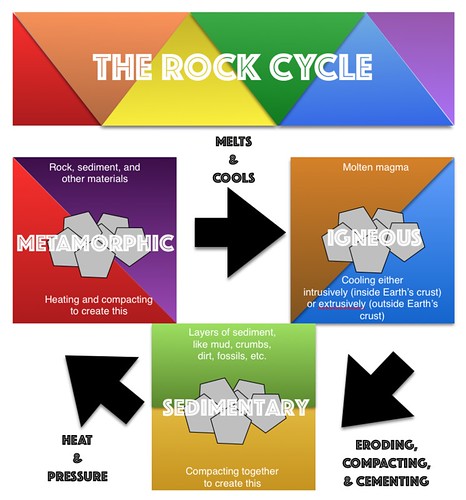
See a few student examples about the Rock Cycle from Kevin Morrow's 8th grade Science class here. Mr. Morrow commented on how visible the student creations made their understanding of the science content he had taught. In addition, he enjoyed the variety and creativity that the project allowed for. 
Rock Cycle Infographics with Pages
Click to advance slideshow through multiple student examples. Or visit the collection at https://www.flickr.com/photos/kmorrow/sets/72157682304347790 

Additional links and resources:


Tuesday, February 14, 2017

Music Teachers Collaboration Day

2017 Music Teachers Collaboration Day was held at ESU 8 on Monday, February 13, 2017.  Some key takeaways may be beneficial to share beyond this local group.

1) Blended Learning : Station-Rotation model

Participants learned through a station-rotation blended learning experience.

BlendEd in the Music Classroom:
“Find Your Rhythm with Blended Learning”

Key Resources:  

Additional Technology + Music Education Resources:

2) Movement + Music : Inspiring Music Educator Kristin Lukow

We connected via Zoom with +Kristin Lukow from Adams Central. She inspired us with her energy and ideas for incorporating movement and multiple learning modalities into her music classroom. We all tried "Bouncing to the Beat" of one her elementary student routines. 

Friday, October 14, 2016

Honey bees in a hologram?

Mrs. Rossman's 4th grade students at West Holt Public School have become experts on honey bees! They wanted to share what they learned with others and thought that creating a hologram might be a memorable experience for all.


First the students researched and learned all the amazing facts about the honey bee. They compiled their research into topics and each constructed a short "script" to explain key findings.

I (Mrs. Morrow) visited the group and showed them how to build hologram "projectors" to use to view hologram videos (from YouTube) on their iPads.  Each student built their own and many questions were asked that added to our collective curiosity, such as "What is the biggest hologram we could create?"

On my next visit, I worked with the kids to begin to create their video.  We decided that the best approach would be a live action video (rather than an app-animated video) and knew we needed to film in front of a green screen in order to make our video appear on a solid black background (for the hologram).

Mrs. Rossman and the students collected great props and costumes and the students brought their scripts to life in front of the green screen!


I initially planned to use the DoInk Green Screen app to assemble the clips, but it was actually easier to do the additional editing (and the green screening) all in iMovie on the Mac.  This made adding the voice over even easier as well.


On my last visit with the group, the kids each recorded their scripts narrating the scenes as voice-overs right in iMovie.  In doing so, they could view the source clip in real time and time out their reading somewhat.

We exported from iMovie and had one full size video, which can be viewed on YouTube here:


The final step was to AirDrop this video to each of the students' iPads.  We started a new Keynote file, widescreen format with black background. We inserted the video once and re-sized it to smaller dimensions. Then we copied and pasted, and rotated the video three more times. (90 degrees, 180 degrees, and 270 degrees) Using Keynote's guides we aligned the four videos so that all the "feet" were touching the inside borders, and attempted to make that interior "window" in the shape of a square.  An animation needed to be added to all four videos so that they all played automatically in unison (and not in succession of each other).


Note from Katie: The widescreen format of our video proved challenging to forming that inner square. It was a bit easier to see if we changed the background color of the Keynote slide to something other than black, and then changed it back at the end. I overlapped the videos a bit trying to get the hologram image as large as possible, but still somewhat centered in the projector pyramid. Also, I muted the sound (turned volume to 0) on three of the video clips to avoid the echo-ish sound that is typical of these video projects.  


So, now our hologram video was complete and we published it on YouTube as well.  Now any iPad with any hologram projector anywhere can enjoy the amazing bee knowledge of these fabulous 4th graders!

Tuesday, October 11, 2016

Full STEAM Ahead!

You’ve heard of STEM, but how can we add STEAM power to our students’ educational environment? Join us to learn how ESU 8 has developed STEAM summer camps to enrich students’ experiences in Science, Technology, Engineering, Art, and Math. Learn great ideas for any teacher or administrator looking to incorporate enrichment programs, clubs, or activities for their school or classroom.


STEAM Activities - Google Site

Heidi Rethmeier's STEM Site

Wednesday, September 21, 2016

Adventures in Art: Be an art analyst! (Green screen activity)


GreenScreen Activity
Be an art analyst! 

View student example from 2015-16 ESU 8 Art Show (Annika Thomas from Norfolk Jr. High)

Discuss key strategies.

Distance from the camera
Hiding “behind” parts of the artwork
Gestures and body movements

Determine access to the DoInk Green Screen app ($2.99)


Steps to Completion
  1. Decide if you want to put your video together on MAC or iPAD.
  2. Choose an art project that you have completed and digitize it. (Scan it or simply take a digital photo of it.)
  3. Write a script that you would say to give a “tour” of your artwork. Things to discuss may include:
    1. IDEATION: How did you get the idea/inspiration for the artwork?
    2. PRODUCT: What medium did you create with?
    3. PROCESS: What process did you go through to complete it?
    4. PRINCIPLES: Which art principles did you employ while creating it?
    5. BACK STORY: Explain the “behind the scenes” meaning and/or techniques used to create.
    6. MESSAGE: What do you hope your audience thinks when they see it?

  1. Film yourself reading your narrative.
MAC
iPAD
Film with iPad camera
AirDrop to a Mac
Airdrop clips from Photos app to another iPad (if desired)
  1. Edit your video
MAC
iPAD
Open iMovie and start a new project
Open the DoInk GreenScreen app and start a new project
Drag in your art project and make it last for longer than you think your video will be
Add your art project to the very bottom track (+ Select a Source: Image)
Drag in your greenscreen video and drop it ON TOP of the art project clip
Insert your greenscreen video in the track ABOVE the art project clip             (+ Select a Source: Video)
Choose Green/Blue Screen from the drop-down effects in toolbar
Adjust the ChromaKey, if necessary
Clean up the area by dragging the handles around the greenscreen area. (Optional crop is also available.)
Pinch and zoom to place your greenscreen clip wherever you want it to appear on your background.
Repeat for additional clips as desired

  1. Export and share!

Tips for a better finished product

Additional Ideas for Student Art Commentary projects


Gallery of finished products!

“Drew’s art example”

“Cardboard art”

“Masks”